Tuesday, January 31, 2012

Day 20: WATER MARBLED Nails

I had only lightly experimented with water marbling before today, so it took me a few tries to figure out what polish was most manageable in the water and what design to create in the water. I began by putting tape on my fingers around my nails for easy cleanup. Then, for my first try, I used various combinations of Pure Ice - Super Star, Revlon Top Speed - Royal, Sally Hansen Xtreme Wear - The Real Teal, Sally Hansen Hard as Nails- Pumping Iron, Sally Hansen Xtreme Wear - Pacific Blue, and Sally Hansen Hard as Nails - Black Heart. Then, I took the tape off and cleaned up the excess polish with a q-tip. I wasn't too pleased with my first try. 


Then, I tried again using just Sally Hansen InstaDri - Co-Bolt Blue, Sally Hansen Xtreme Wear - The Real Teal, and Sally Hansen Hard as Nails - Pumping Iron. These turned out much better. I decided to top it off with Claire's - Glitter Top Coat.


And one last try.... I used Sally Hansen InstaDri - Magenta Motion and Essie - St. Lucia Lilac. Since I didn't do a base coat before the water marble, you can see through to my nails on some of them, but, overall, I think the marbling on these turned out the best. Finally, I decided to top these off with Wet n Wild - Sparked. 


Check out my tumblr, too!

Monday, January 30, 2012

Day 19: GALAXY Nails

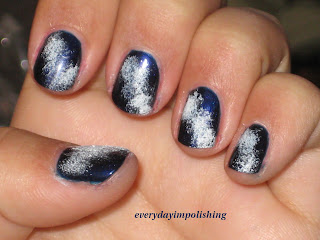
I had never done galaxy nails before either, so I used Nail Art 101's Tutorial as a starting point. I started with two coats of Ulta - Blue For You. Then, I tore a small piece off of a makeup sponge. I used this piece of sponge to sponge on Pure Ice - Super Star in a diagonal pattern across my nails. 


Then, I sponged on Sally Hansen Xtreme Wear - The Real Teal just outside of the white. I also added a little bit of Essie - Sexy Divide, Sinful Colors - Purple Diamond, and Essie - Borrowed & Blue. Then, I sponged on some Pure Ice - Black Rage in the corners, just as Nail Art's Tutorial directed. Finally, I used Milani Nail Art Polish - White Canvas to create white dots that look like stars. 


I like how they turned out before adding glitter (above), but then I decided to see what it would look like if I added some Claire's silver glitter from the Claire's Precious Metals set. 


Finally, I added Claire's - Glitter Top Coat to give me the look below! 


Here are all the polishes I used, in the order I used them.


Check out my tumblr, too!

Sunday, January 29, 2012

Heart Stamp

I did these on Thursday night, because I visited my friend Lindsay at Indiana University over the weekend, and these nails are sort of IU school colors. I started with two coats of Sephora nail polish that I got 7 years ago, and, as far as I can tell, it does not have a name. Then, I used Konad Special Nail Polish in silver with BM02 for the heart stamp. 


Check out my tumblr, too!

Day 18: HALF MOON Nails

I started with two coats of Pure Ice - Silver Mercedes. Once that was completely dry, I used Sally Hansen French Tip Nail guides and placed them at the base of my nail to cover a half moon shape. Then I painted the rest of my nail red with Sally Hansen Insta Dri - Rapid Red, and I peeled the nail guide off, leaving what you see here:


Then, I decided to add a black line in between the silver and red using my Salon Perfect Nail Art Liner in black, but I think I prefer how it looks before I did that. What do you think?


Check out my tumblr, too!

Saturday, January 28, 2012

Day 17: GLITTER Nails

I have a ton of glitter nail polish, and I could not decide which one to use for the challenge. It also took me a really long time to find the right combo for a look that I really liked. Here are all the variations I tried, but the last one is the last one I did and also my favorite.


This is two coats of Sephora - Vintage Sweater followed by two coats of Forever 21's Love and Beauty - Multi Glitter Nail Polish, which has red, silver, blue, and fuchsia glitter: 


Here is two coats of Pure Ice - Super Star followed by two coats of of Forever 21's Love and Beauty - Multi Glitter Nail Polish.


This is two coats of Sally Hansen Xtreme Wear - Strobe Light:


This is two coats of Wet n Wild - FuchsiaRama followed by two coats of Nicole by OPI - Rainbow in the S-Kylie:


This is two coats of Pure Ice - Super Star followed by two coats of Nicole by OPI - Rainbow in the S-Kylie:


And, finally, my favorite....two coats of Essie - Borrowed & Blue followed by two coats of an unnamed blue and purple glitter polish from Claire's Precious Metals set...


Check out my tumblr, too!

Friday, January 27, 2012

Day 16: TRIBAL PRINT Nails

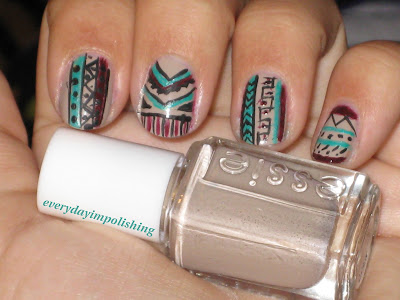
I kept putting these nails off, because I didn't really have any inspiration and I was wary that I could pull it off. Although I'm not a huge fan of the colors I used, I think they turned out alright. I completely copied Nailasaurus's design. I like the colors she used a lot more! I think mine have a very southwestern feel with the turquoise color, though. 


I started with two coats of Essie - Jazz. Then, I used Salon Perfect Nail Art Liner in black, OPI - Oh..To Be 25 Again!, Sinful Colors - Rise and Shine, and a fine-tip brush to create the design. 


Check out my tumblr, too!

Thursday, January 26, 2012

Day 15: DELICATE PRINT Nails

Ugh, so first of all...I don't like delicate prints. Secondly, none of my attempts at delicate print nails turned out very well. The lacy blue tips below were my third attempt at that pattern. I was having a lot of trouble positioning the stamp right on the tip of my nails..does anyone else have this problem while nail stamping?? Anyways, after my third attempt with that stamp, I gave up. But, here's a picture of attempt 3:


I used two coats of Essie - Waltz for the base. Then, I used Sally Hansen Insta Dri - Co-Bolt Blue with BM18 for the tips. 

Below was my next attempt at delicate print nails. Here, I used two coats of Sally Hansen Xtreme Wear - Pacific Blue for the base. Then, I used Pure Ice - Super Star with BM 21 for the pattern.


Check out my tumblr, too!

Wednesday, January 25, 2012

Day 14: FLOWER Nails

For these nails, I started with two coats of Sally Hansen Insta Dri - Pronto Purple. Once that was dry, I used Pure Ice - Silver Mercedes with BM12 for the flower design!


Here's a close-up of one of the nails:


Check out my tumblr, too!

Tuesday, January 24, 2012

Day 13: ANIMAL PRINT Nails

I was a little worried about doing the animal print nails, but I'd say these turned out ok..and they were very easy! First, I applied two coats of Barry M - Pink Flamingo. Then, using a Salon Perfect Nail Art Liner in black, I followed this pattern for the zebra print. And, I finished with a Sally Hansen Dries Instantly Top Coat.


Check out my tumblr, too!

Monday, January 23, 2012

Day 12: STRIPED Nails

For these striped nails, I started with two coats of Essie - French Affair. Then, I did two stripes of each of 3 colors of Stripe Rite...Silver, Purple Metallic, and Light Blue Metal! That's all!


Check out my tumblr, too!

Sunday, January 22, 2012

More New Glitter Polish

I got these new glitter polishes at Claire's in Chicago. This Precious Metals set was $10.


The polishes don't have names, but here are two coats of each over two coats of black and two coats of white. The far left polish is on my pinky and the far right is on my thumb.


Day 11: POLKA DOT Nails

I love these! I started with two coats of each of my base coats. Sally Hansen Xtreme Wear - The Real Teal on the four nails and Pure Ice - Super Star on the accent nail. Then, I used the fine-tip end of these q-tip/makeup applicators to create the dots.


Check out my tumblr, too!

Turquoise Stars

I got some new nail polish yesterday at Forever 21 in Chicago. Here are two of the ones I got. First, I applied two coats of love & beauty - turquoise gem. Then, I applied two coats of love & beauty - blue stars. I wish there were more stars in the polish!


Saturday, January 21, 2012

Day 10: GRADIENT Nails

This is my first time doing gradient nails... They were extremely easy to do, but I'm not sure that I did them very well. I started with two coats of Essie - Borrowed & Blue. After that was dry, I used a makeup sponge to dab on the next color (Essie - Lapiz of Luxury) while leaving part of Borrowed & Blue still showing. I repeated this with Sally Hansen - Pacific Blue, and then again with Sally Hansen - Cosmic Blue for the tips. 


Check out my tumblr, too!

Friday, January 20, 2012

Day 9: RAINBOW Nails

Woohoo rainbow day! These were super fun. First, I started with two coats of Essie - Borrowed & Blue. Then, I painted on the stripes with a fine tip brush leaving a small amount on the tip for the clouds. The colors are Sally Hansen Insta-Dri - Rapid Red, Wet n Wild Wild Shine - Sunny Side Up, Sally Hansen Xtreme Wear - Mellow Yellow, Wet n Wild Fast Dry - SaGreena the Teenage Witch, Essie - Mezmerised, and Essie - Sexy Divide. Then, I poured some Pure Ice - Super Star onto a paper towel, dipped a q-tip in it, and dabbed the q-tip on the nails to make the clouds. 


Check out my tumblr, too!

Blue and Gray Circular Nails

More nail stamping! I'm going to Chicago tomorrow and I just wanted something cool and simple..and this is what I came up with. First, I applied two coats of love & beauty - light grey (got this from Forever 21). Then, I made the design using Essie - Mezmerised and BM02! This was so simple and took no time at all!


Check out my tumblr, too!